


Understanding how to load, use, and change push disks on a dual component caulk gun is essential if you are working with a variety of products, with a variety of mix ratios. Dual-component dispensers rely on properly sized and aligned push disks to work with different mix ratio cartridges, and because Newborn offers some of the most versatile systems available, knowing how to swap and configure these disks ensures your gun performs exactly the way it should with the materials you are using.
Every Newborn manual and pneumatic dual-component model includes a push disk chart with diagrams for each disk size, instructions for selecting the right configuration, mix-ratio guidance, and tools if needed to remove and replace the disks. This guide walks you through how push disks work on our most common systems and what to do when it’s time to change them.

Why Push Disks Matter
Push disks ensure that both sides of your dual-component cartridge dispense at the correct ratio. If the disk isn’t aligned, sized, or seated correctly, the material will not extrude, or you won’t get an accurate and consistent bead. This is a big problem, because you may not achieve the proper cure.
Different guns, cartridge sizes, and mix ratios require different disk configurations, so always refer to the push disk chart included with your tool.
Manual Dual-Component Guns
435-XSP Series (1:1 and 2:1)
https://newborncaulkguns.com/products/435-xsp/
The 435-XSP lineup is built to accommodate both 1:1 and 2:1 mix-ratio cartridges. Since the mix-ratio range is simpler, you only need to change one push disk when switching ratios.
Key features for this series:
- Uses plastic push disks
- Requires a Philips head screwdriver to remove and install disks
- Includes a push disk chart with diagrams and instructions
How to Change the Push Disk:
- Use a screwdriver to remove the screw that attaches the disk to the rod.
- Refer to your push disk chart to confirm the correct disk size for your mix ratio.
- Align the arrows on your new disk inward (toward each other).
- Press the disk onto the rod, and using your screwdriver, tighten the screw to hold the disk in place.
If the arrows aren’t aligned inward, the disk won’t sit properly inside the cartridge.
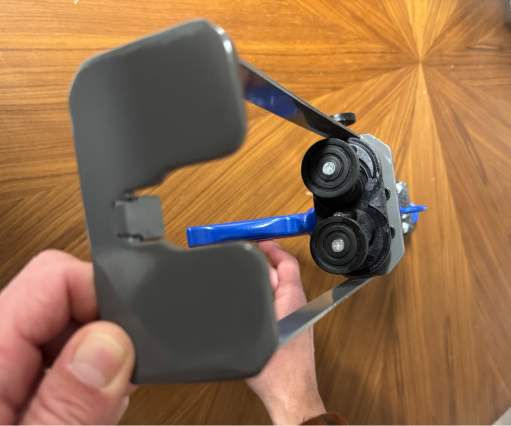
535-XSP Series (1:1, 2:1, 4:1, 10:1)
https://newborncaulkguns.com/products/535-xsp/
The 535-XSP is our most versatile manual side-by-side series. Because it handles a wide range of mix ratios, you may need to change more than one disk depending on your cartridge setup.
Key features for this series:
- Uses metal snap-on disks
- Mix-ratio versatility: 1:1, 2:1, 4:1, 10:1 and more
- Push disks snap on/off without tools
- Includes a push disk chart for quick reference
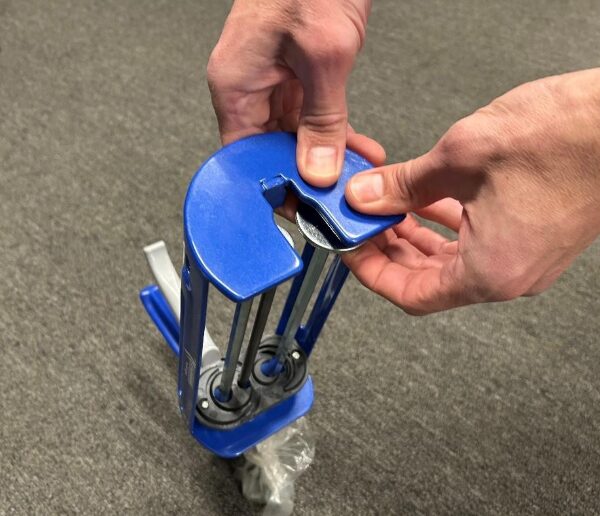
How to Remove the Disks:
- Use the front frame of the gun for leverage to pop off the disk.
- If the disk is stubborn, gently tap it with a hammer to release it.
Installing the New Disk:
- Align the arrows on the disk inward.
- Press firmly until the disk snaps in place.
Misaligned arrows mean the disk won’t slide into the cartridge properly, always check before loading your materials.

Pneumatic Dual-Component Guns
All Newborn pneumatic dual-component guns come with a push disk wrench designed specifically for removing and installing disks quickly and safely.
VR Series Pneumatic Guns (1:1, 2:1, 4:1, 10:1)
https://newborncaulkguns.com/products/vr400a83/
The VR series is designed specifically for “200ml” and “400ml” cartridges, which are industry shorthand for sizes that fall within the 200–250ml and 400–490ml ranges. This makes the VR lineup simple and straightforward, with only two cartridge families to accommodate.
How to Remove the Push Disk:
- Use the smaller side of the push disk wrench.
- Insert the wrench between the “shoulder” of the rod and the back of the disk.
- Push downward—this will leverage the disk off the rod.
- Once loosened, pop the disk off by hand.
How to Install the New Disk:
- Refer to your push disk chart to select the correct disk for your cartridge volume and mix ratio.
- Align the arrows inward.
- Press the disk firmly onto the rod until it clicks into place.
800A Pneumatic Series (1:1, 2:1, 4:1, 10:1)
https://newborncaulkguns.com/products/850a75/
The 800A series are built to handle a wide range of dual-component cartridge sizes, from 450ml and 600ml all the way up to 1500ml configurations and many others in between. Because these guns support such a large variety of cartridge formats, their push-disk charts include numerous size and mix-ratio combinations. This model comes with:
- A push disk wrench
- An Allen key (required for the lock screw)
Removing the Disk:
- Use the included Allen key to remove the center lock screw.
- Insert the smaller side of the push disk wrench between the shoulder and the back of the disk.
- Push downward to leverage the disk off the rod.
- Once loosened, pop it off completely.
Installing the New Disk:
- Check the push disk chart for the correct disk size and mix ratio.
- Align arrows inward and push the disk firmly onto the rod.
- Reinsert the center lock screw.
- Use the Allen key to tighten and secure the disk.

Final Tips for Smooth Dispensing
- Always verify your cartridge’s mix ratio before loading the gun.
- Double-check arrow alignment on every disk before installing.
- Keep your push disk chart nearby—every gun ships with one for easy reference.
- If a disk feels stuck, “wiggle” it or apply gentle, even pressure rather than force.
- For pneumatic guns, make sure the air supply is disconnected before changing disks.
You may also like:
 How To Change the Push Disks on a Pneumatic Gun
 How to Caulk Your Bathtub the Right Way: A Simple, Step-by-Step Guide
 Mastering the Drip-Free Caulk Gun: A Comprehensive Guide to the 112D, 102D, and 189D Models
 General Product Knowledge for Single Component Dispensers & Accessories
 Mastering the Sausage Caulk Gun101: A Step-by-Step Guide
 How to Caulk in Tight Spaces: Techniques and Tools for a Clean Finish
 How To Caulk
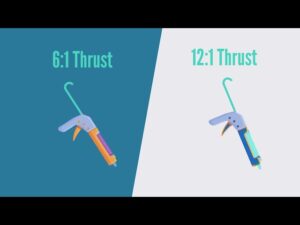 Mastering Thrust Ratio: Your Guide to Choosing the Perfect Caulk Gun for Any Project